PropellerAds integration in CPV One | CPV Lab
This is a guide showing step-by-step how to use CPV Lab and CPV One tracker to track campaigns using PropellerAds (opens new window) traffic source.
Who is PropellerAds?
PropellerAds (opens new window) provides powerful performance marketing solutions on a global scale for brands, agencies, and affiliates. Founded in 2011, the company is now one of the biggest traffic provider with 1Bln+ monthly audience reach and thousands of advertising campaigns launched daily, across desktop and mobile.
Video on how to setup a PropellerAds Campaign in CPV Lab | CPV One
Step 1: Add PropellerAds as a traffic source in CPV One | CPV Lab
CPV One comes with the PropellerAds Traffic Source pre-configured in the Traffic Sources Catalog pages, so in this case all you have to do is import it from the Catalog.
- Access your CPV Lab or CPV One account
- Navigate to the "Sources" tab and locate the option for "Traffic Sources"
- Click on the "Import from Catalog" button

- Select PropellerAds
- CPV One will pre-populate all the traffic source settings

- Click Save
Step 2: Add an Offer Source (optional)
If you are using your own offer and not utilizing an Offer from an Affiliate platform, please proceed to Step 3 below.
To integrate an Affiliate network, navigate to the "Sources" section from the menu and select "Offer Sources".
Go to the "Import from Catalog" where you will discover a selection of Affiliate networks available for integration.
Pick the one you are using for offers and save it once the fields are loaded.
If your specific Affiliate network is not listed, you have the option to manually define it by adding the parameters required by the affiliate platform you are using and save it from the "Offer Source" page.
More info about Affiliate Networks
Step 3: Adding Landing Page & Offer URLs to Campaigns
Before creating a campaign you need to make sure you have your landing pages and offers defined. Once you define your landing pages and offers, you can then use them for your campaigns.
- To add Landing pages go to LPs&Offers -> LPs Management menu
- To add new offers go to: LPs&Offers -> Offer Management menu
Note: you can add the landing pages and offers when you create your campaign as well.
Step 4: Set up your campaign in CPV One | CPV Lab
To start your campaign, click on the top blue button that says: "New Campaign".
You will encounter a menu providing options for creating a campaign based on your preferences.
Alternatively, you can navigate to the Campaigns List and select your desired campaign from there, and edit or clone one of them.


In this tutorial, we will be using a "Direct Link & Landing Page" configuration.
Begin by assigning a "Name" to the campaign, and then proceed to scroll down to the section labeled "Macros & Tokens".

- Choose PropellerAds as the designated Traffic Source for this campaign

Keep scrolling down the page. If you use a Landing Page, you can input it at this stage in the "Landing Pages" section;
Under the "Offers" section, click on "Select Predefined Offer" and choose the Offer you previously created in Step 2 above. The remaining parameters will be automatically populated based on the settings defined for the selected Offer.

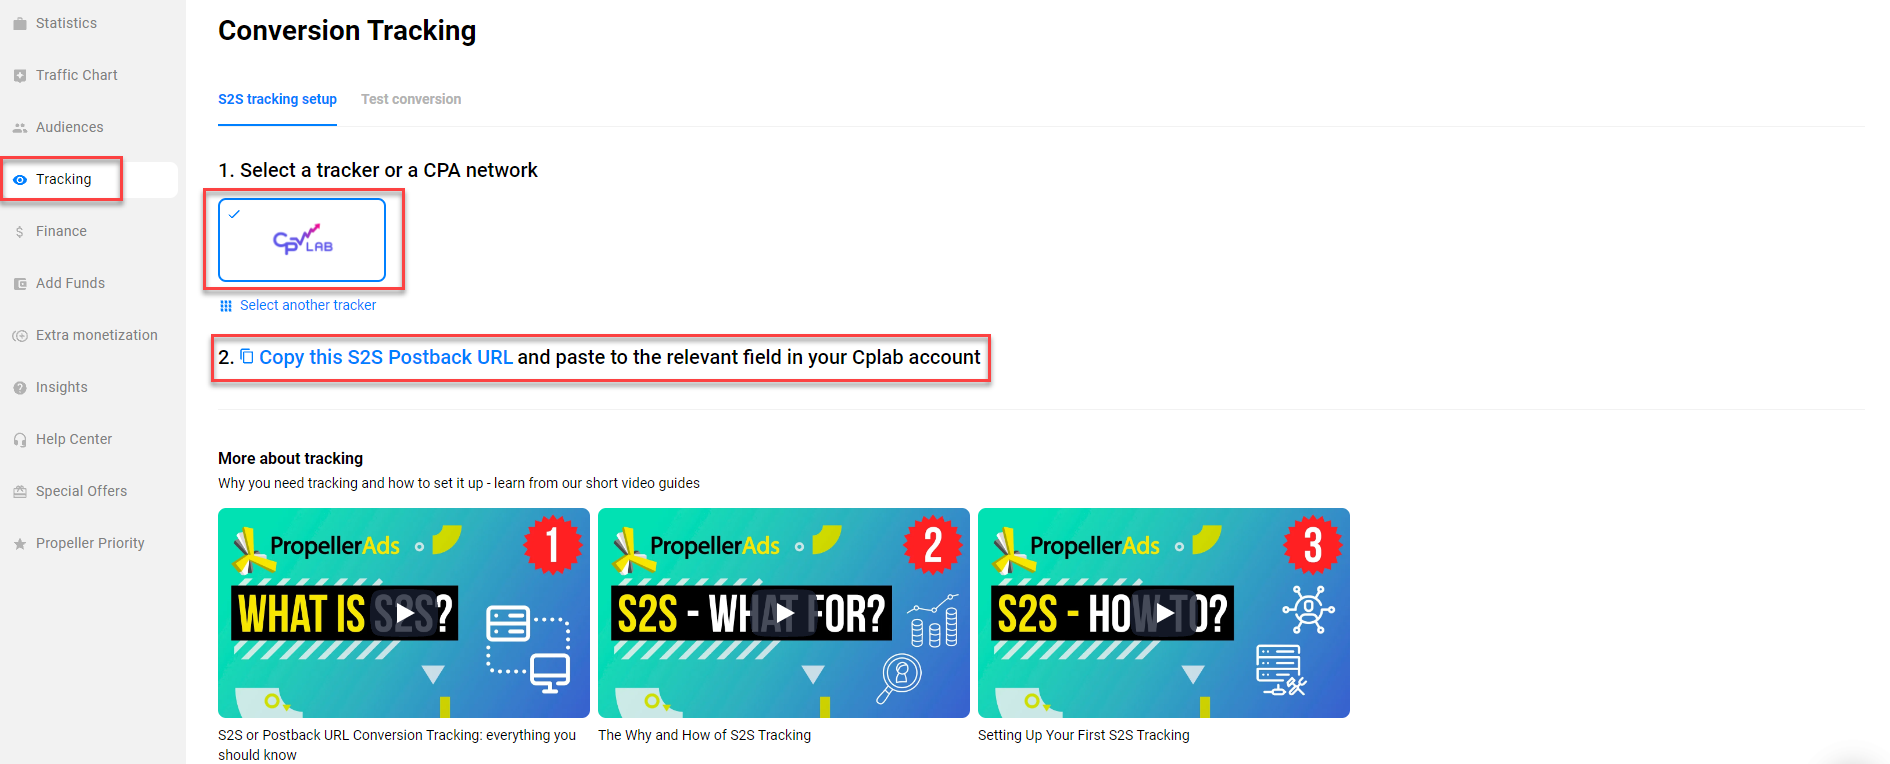
Step 5: Setup the Postback URL
In order to track conversions into the PropellerAds platform, you need to set up the Postback URL from PropellerAds as the Traffic Source Postback URL in the Campaign setup page from CPV One.
The tracker will fire the Postback URL and send information about conversions to PropellerAds so they can optimize their attribution algorithm.
The Postback URL should contain the CPV One macro {!tscode!} (for Unique Click ID).
You need to select if you want to use the Postback URL (recommended!) when you create the campaign.
- in the campaign setup page go to the "Tracking Pixel: Add Pixel to Offer Source" section.
- Check/select the "Traffic source Postback URL".

- If the Postback URL is not available (it was not set up or was deleted for this Traffic Source) then you can enter the following Postback URL as Traffic Source Postback URL in the Campaign Setup page from CPV One:
Note: You will find your updated Postback URL in the PropellerAds platform.
Step 6: Create the campaign in PropellerAds
Login to your PropellerAds account
Create a new campaign by clicking “Create campaign”

In the Target URL section, paste the Campaign URL from CPV One
The Campaign URL (provided in the "Links & Pixels" section from your Campaign Setup page) has all the parameters you selected as Macros for your campaign. So, the information will be tracked in the ad tracker.
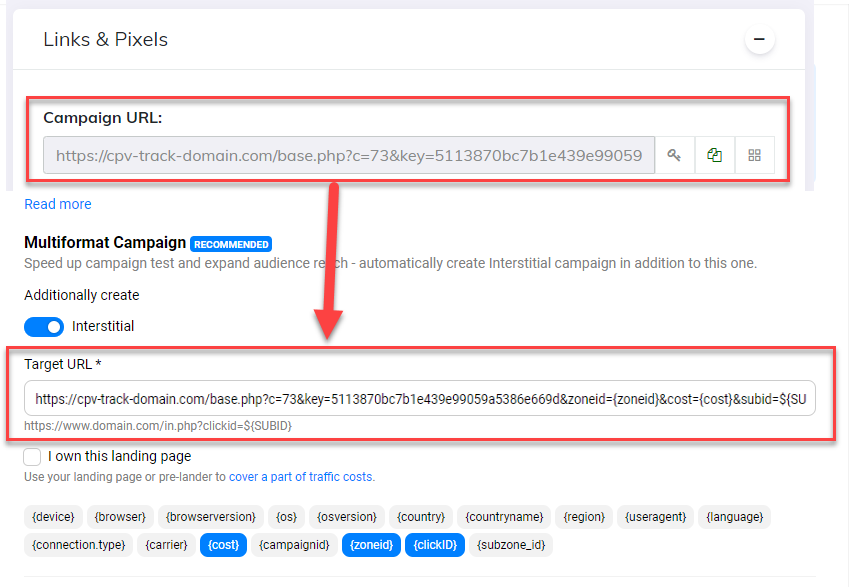
Complete all the other fields and save
Once the campaign is launched, you can track it and check all the metrics in CPV Lab / CPV One. If the setup has been done for the Postback URL, you will start seeing conversions both in CPV One and PropellerAds.
That's it!
You may find useful: Tracking Links explained