Tracking Listicles
What is a listicle?
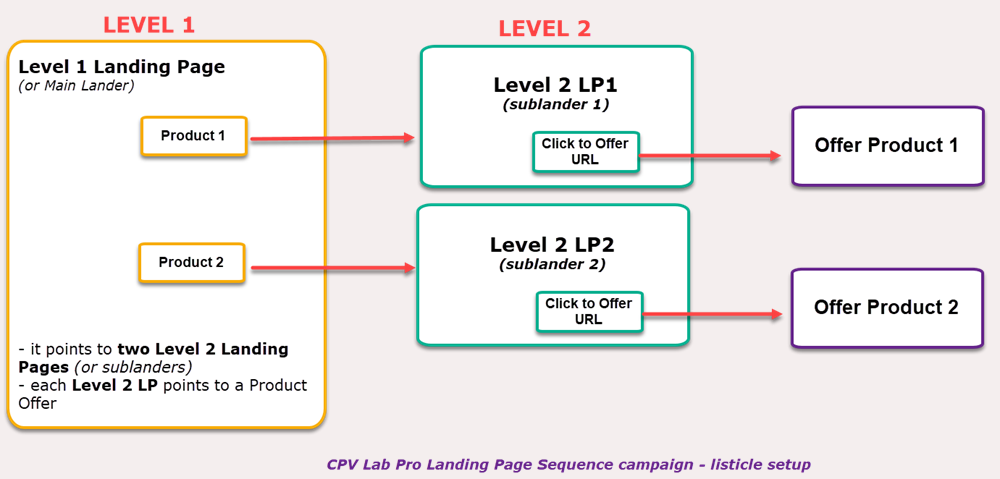
The typical Listicle-type traffic flow consists of the following:
- A Main Landing Page (Lander) that represents the entry point of the campaign. This page contains details about multiple products (offers).
- An extra Landing Page (Sublander) for each product (offer) presented in the Main Landing Page
- An Offer Page for each product (offer)
Such a setup can be easily tracked in CPV Lab Pro (opens new window) using a Landing Page Sequence campaign which allows multiple Levels of Landing Pages and linking to specific pages in the sequence.
Main advantages of the Listicle campaigns
- You can promote an unlimited number of products (offers) in the Main Landing Page
- You can have an unlimited number of Level 2 Landing Pages (Sublanders)
- You can have more than one Offer Page for each product (offer) and these Offer Pages will be rotated for your visitors
- Clicks to all Sublanders and Offer Pages as well as conversions from all Offer Pages will be tracked in CPV Lab Pro
- Works even when visitors get directly to the landing page instead of going through the Campaign URL first.
- This is useful when using Google Ads or Facebook Ads or when dealing with organic traffic. In order to allow this, you need to implement the Direct Traffic Code in the main landing page
A. Listicle Setup - Basic
Basic example:
Listicle campaign with 2 products and one Offer Page for each product.
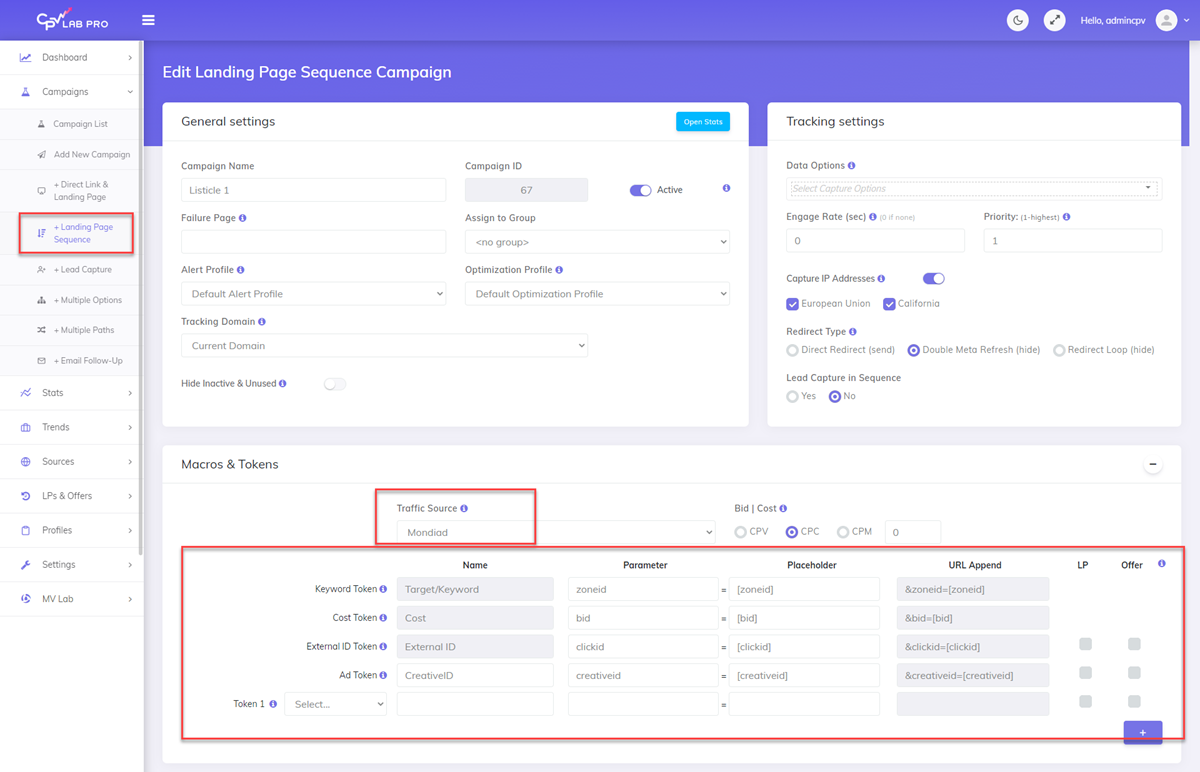
Step 1: Create your campaign
- Create a Landing Page Sequence campaign in CPV Lab and select the desired Traffic Source.
- Choose the Extra Tokens that you want to track from your Traffic Source.
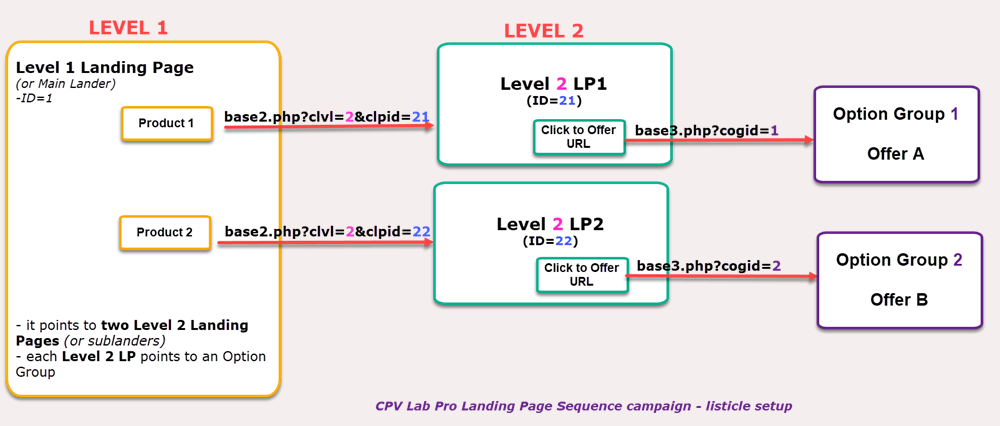
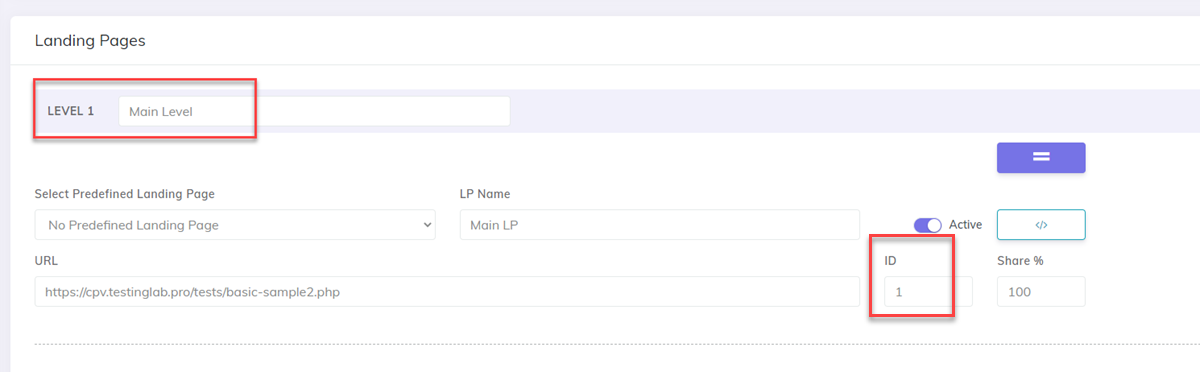
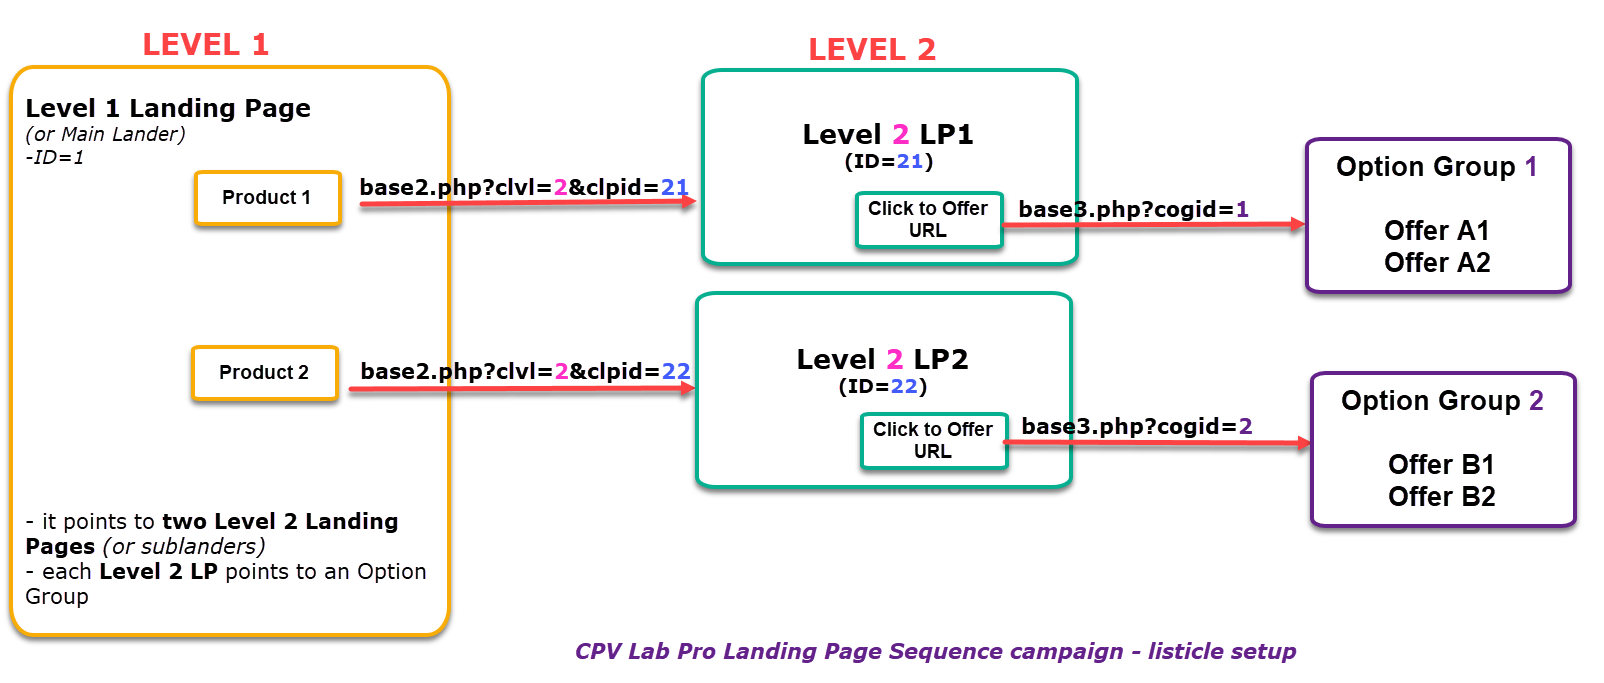
Step 2: Main page as Level 1
- Setup the Main Landing Page as the single Level 1 Landing Page and set its ID to 1
Step 3: Levels for sublanders
- Add a new Level to your campaign using the
+ Add Levelbutton – this second level will be for the extra landing pages (sublanders) - Setup the Extra Landing Pages (Sublanders) in the Level 2 LPs section.
- Set their IDs to 21 and 22 respectively and the Shares to 50% each

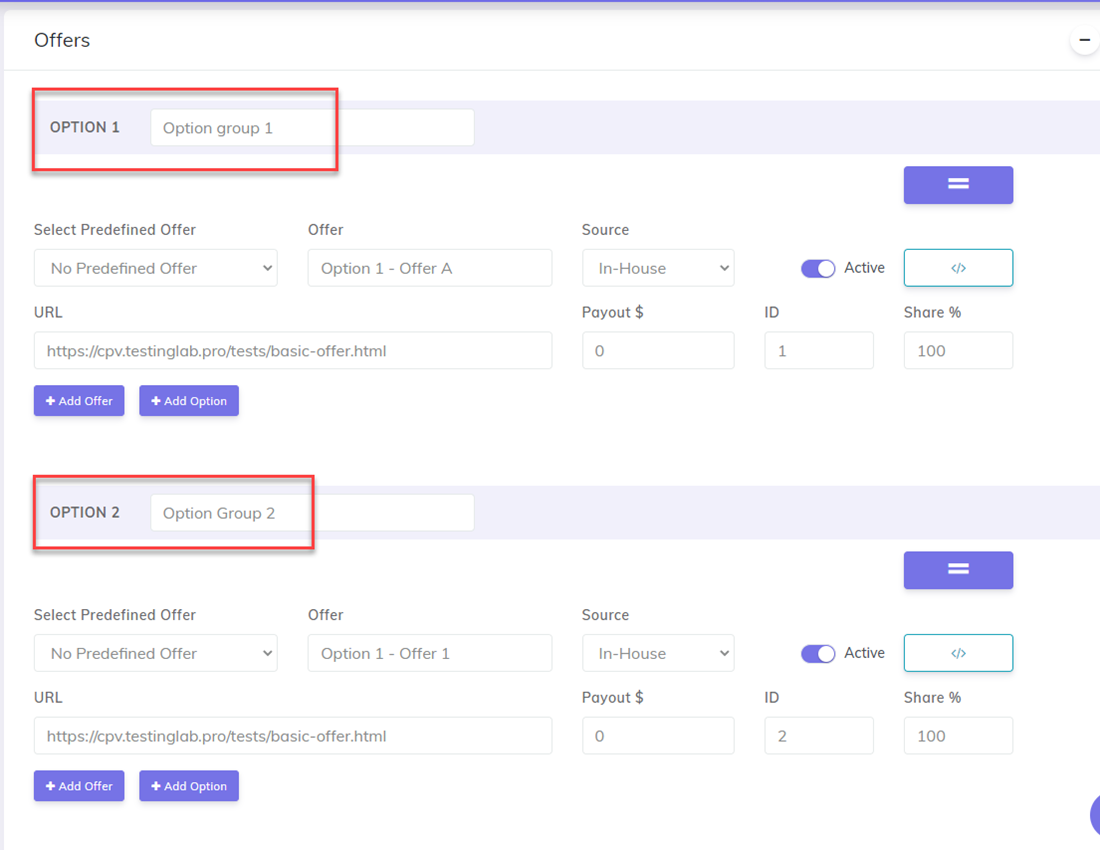
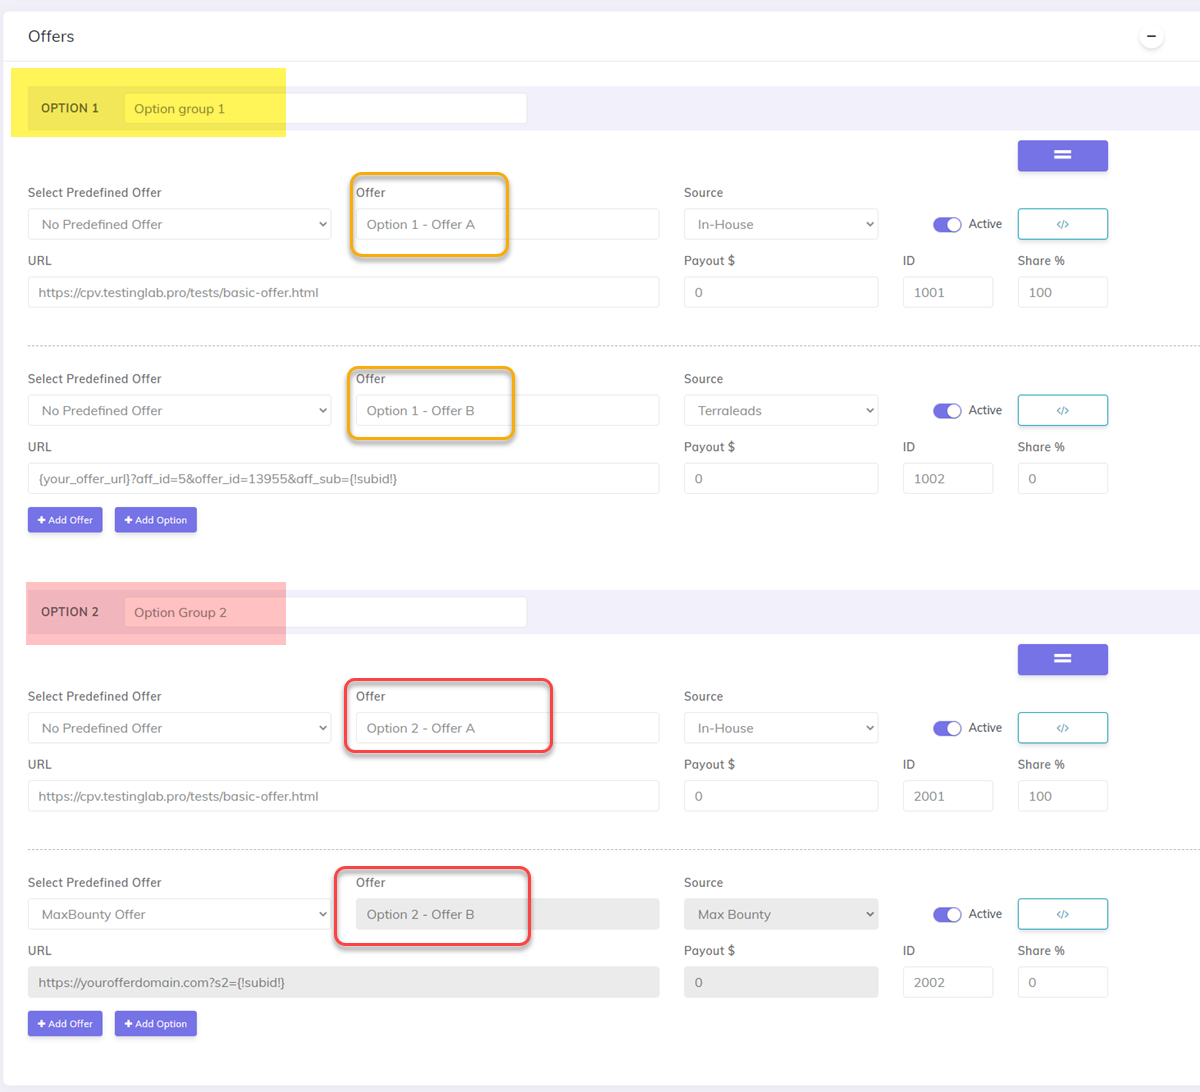
Step 4: Setup offers in Option Groups
- Setup the Offer Pages in separate Option Groups. Since we have 2 products (offers), we will have 2 Option Groups.
- The Offer Page for product 1 will be setup in Option Group 1, while the Offer Page for product 2 will be setup in Option Group 2.
Step 5: Use tracking links in your landing pages
- Change the links from your landing pages (main and extra landing pages) to the CPV Lab Pro tracking links:
- in the Main Landing Page - link to the Level 2 Landing Page using the
base2.phptracking link, theclvlparameter (to specify the linked level 2) and theclpidparameter (to specify the Level 2 landing page to link to): - in the extra landing pages use the
base3.phptracking link and thecogidparameter to redirect to the corresponding Option Group for each product:
- in the Main Landing Page - link to the Level 2 Landing Page using the
Step6: Save the campaign
- Save the campaign and your setup is complete.
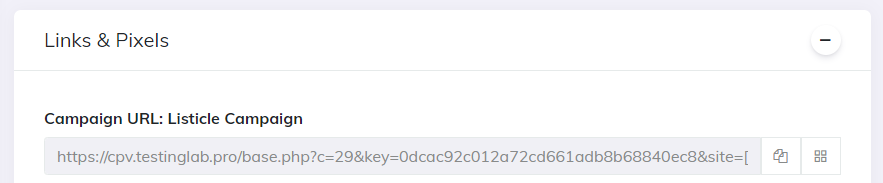
- You can now test it using the Campaign URL provided in the Campaign Setup page.
B. Listicle Setup - Multi-offer pages
Multi-offer pages example:
Listicle campaign with 2 products and 2 Offer Pages for each product (the 2 pages will be rotated for visitors).
Step 1: Create a Landing Page Sequence campaign
- Create a Landing Page Sequence campaign in CPV Lab and select the desired Traffic Source.
- Choose the Extra Tokens that you want to track from your Traffic Source.
Step 2: Main page as Level 1
- Setup the Main Landing Page as the single Level 1 Landing Page and set its ID to 1
Step 3: Levels for sublanders
- Add a new Level to your campaign using the
+ Add Levelbutton – this second level will be for the extra landing pages (sublanders) - Setup the Extra Landing Pages (Sublanders) in the Level 2 LPs section.
- Set their IDs to 21 and 22 respectively and the Shares to 50% each
Step 4: Offers in separate Option Groups
- Setup the Offer Pages in separate Option Groups for each product.
- Since we have 2 products (offers), we will have 2 Option Groups.
- The 2 Offer Pages for product 1 will be setup in Option Group 1, while the 2 Offer Pages for product 2 will be setup in Option Group 2.
- CPV Lab (opens new window) will rotate between the offer pages within each Option Group for each visitor (based on the shares setup for each offer)
Step 5: Use tracking links in your landing pages
- Change the links from your landing pages (main and extra landing pages) to the CPV Lab Pro tracking links:
- in the Main Landing Page - link to the Level 2 Landing Page using the
base2.phptracking link, theclvlparameter (to specify the linked level 2) and theclpidparameter (to specify the Level 2 landing page to link to): - in the extra landing pages use the
base3.phptracking link and thecogidparameter to redirect to the corresponding Option Group for each product:
- in the Main Landing Page - link to the Level 2 Landing Page using the
Step6: Save the campaign
- Save the campaign and your setup is complete.
- You can now test it using the Campaign URL provided in the Campaign Setup page.
TIP
Note: The only difference between Listicle - Basic setup and Listicle-Multi-offer setup is this:
- on the Basic setup you have one offer for each sublander.
- on the Multi-offer setup you can have multiple offers for each sublander and each offer will be rotated based on its share.
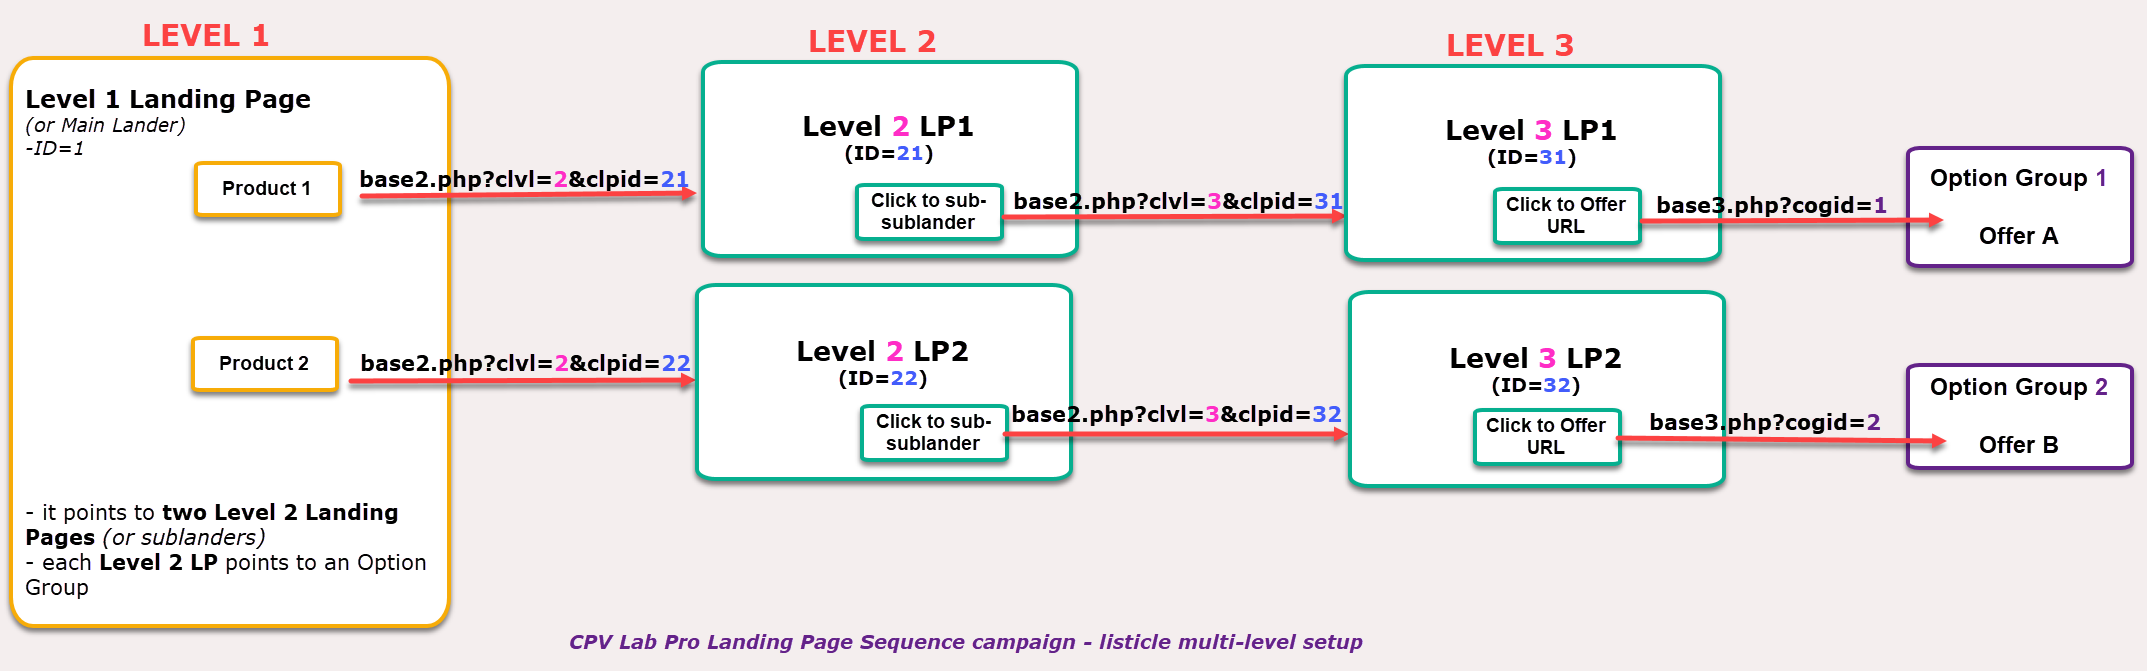
C. Listicle Setup - Multi-level
Multi-level example: Listicle campaign with 2 products and one Offer Page for each product.
- It contains an extra Landing Page Level (Sub-sublander) for each product
- Step 1: Create a Landing Page Sequence campaign in CPV Lab Pro and select the desired Traffic Source.
- Choose the Extra Tokens that you want to track from your Traffic Source.
- Step 2: Setup the Main Landing Page as the single Level 1 Landing Page and set its ID to 1
- Step 3: Add a new Level to your campaign using the
+ Add Levelbutton – this second level will be for the extra landing pages (sublanders) - Step 4: Setup the Extra Landing Pages (Sublanders) in the Level 2 LPs section.
- Set their IDs to 21 and 22 respectively and the Shares to 50% each
- Step 5: Add a new Level to your campaign using the
+ Add Levelbutton – this third level will be for the extra landing pages (sub-sublanders) - Step 6: Setup the Extra Landing Pages (Sub-sublanders) in the Level 3 LPs section.
- Set their IDs to 31 and 32 respectively and the Shares to 50% each
- Step 7: Setup the Offer Pages in separate Option Groups. Since we have 2 products (offers), we will have 2 Option Groups.
- The Offer Page for product 1 will be setup in Option Group 1, while the Offer Page for product 2 will be setup in Option Group 2.
- Step 8: Change the links from your landing pages (main and extra landing pages) to the CPV Lab Pro tracking links:
in the Main Landing Page - link to the Level 2 Landing Page using the
base2.phptracking link, theclvlparameter (to specify the linked level 2) and theclpidparameter (to specify the Level 2 landing page to link to):in the extra landing pages from Level 2 use the
base2.phptracking link, theclvlparameter (to specify the linked level 3) and theclpidparameter (to specify the Level 3 landing page to link to):in the extra landing pages from Level 3 use the
base3.phptracking link and thecogidparameter to redirect to the corresponding Option Group for each product:
- Step 9: Save the campaign and your setup is complete.
- You can now test it using the Campaign URL provided in the Campaign Setup page.
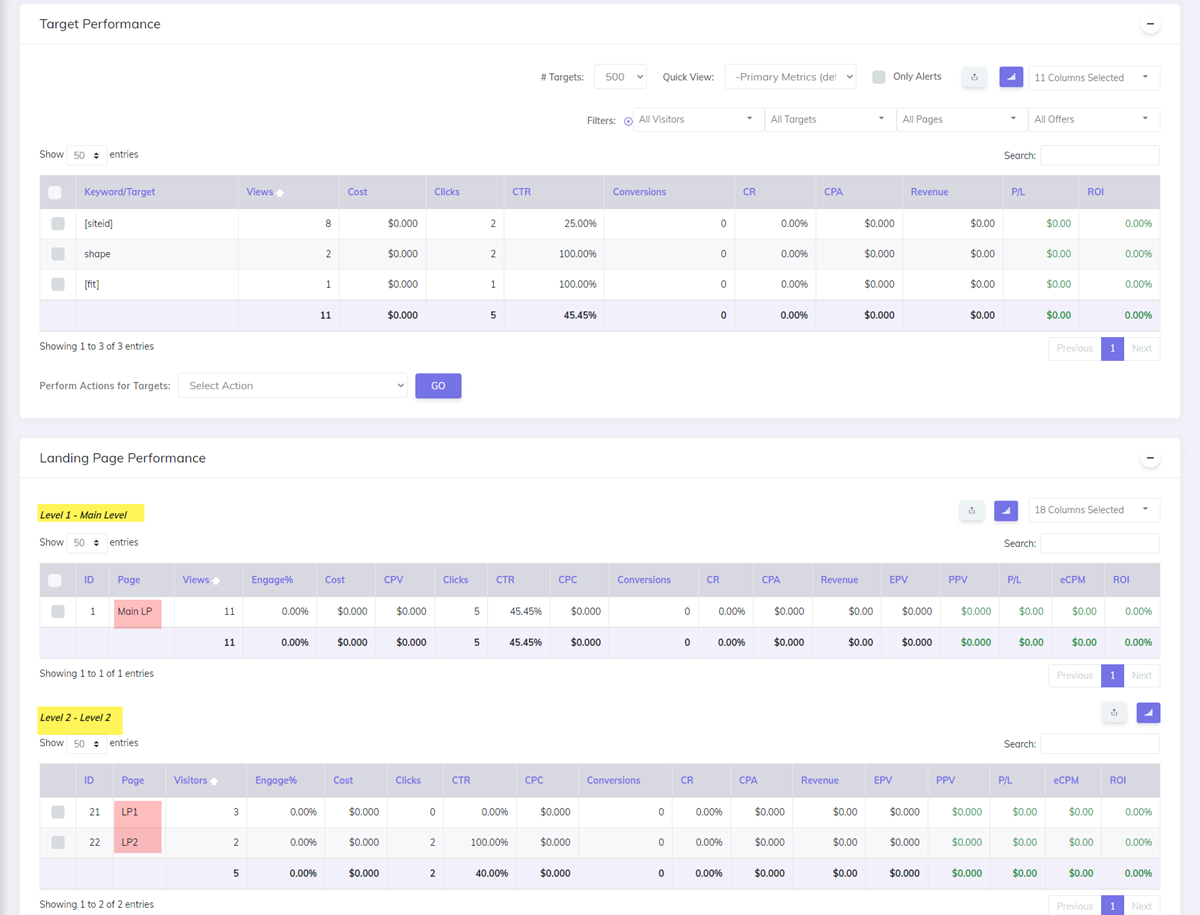
Viewing data in Stats
- Results from the listicle-type campaign can be seen in the same way as with a regular campaign. You can check results in the Stats, Visitor Stats, Conversion List pages.
- Detailed metrics for the Main Landing Page and Sublanders can be seen in the Landing Page Performance tables from the Stats page where you will find a report for each Level of your campaign.