Mobplus Integration with CPV Lab | CPV One
Mobplus (opens new window) is a global performance marketing network. It specializes in mobile subscriptions (mVAS) and lead generation (CPL). With over 10 years of experience and 50,000+ direct and exclusive offers, it is a strong choice for affiliate marketers running mobile and lead gen campaigns.
This guide shows you how to connect Mobplus with CPV Lab | CPV One and set up your first campaign - step by step.
What is Mobplus?
Mobplus is a CPA and CPL affiliate network focused on:
Main verticals:
- CPL: Sweepstakes, Coupon, Voucher, Insurance, Survey, Smartlink, Home Improvement, Dating, Loans, and more
- CPA: Mobile Value-Added Services (mVAS)
Why affiliates use Mobplus:
- 50,000+ live direct and exclusive offers
- Guaranteed payments with multiple payout options
- Low minimum payout threshold ($100)
- Responsive account managers
🎁 Exclusive bonus for CPV Lab | CPV One users: Get +$20 to your payout from $200 when you sign up using promo code from the Bonuses section inside the CPV dashboard.
How the Integration Works
CPV Lab | CPV One tracks your Mobplus campaigns using a Postback URL (also called Server-to-Server or S2S tracking).
Here is the flow:
Visitor clicks your ad
        ↓
CPV Lab records the click and assigns a unique SubID
        ↓
Visitor lands on the Mobplus offer page
        ↓
Visitor converts
        ↓
Mobplus fires the Postback URL and passes the SubID back to CPV Lab
        ↓
CPV Lab records the conversion in your campaign report
For this to work, you need to:
- Add Mobplus as an Offer Source in CPV Lab | CPV One
- Set the CPV Lab Postback URL in your Mobplus account
- Add the Mobplus offer link correctly in CPV Lab
- Create and test your campaign
Step 1 - Add Mobplus as an Offer Source
Mobplus is already pre-configured in the CPV Lab | CPV One Offer Sources Catalog. You do not need to set it up manually.
- Go to Offers ➡️ Offer Sources in your CPV Lab | CPV One dashboard.
- Click Catalog to browse the pre-configured offer sources.
- Find Mobplus in the list and click Import.
- Click Save
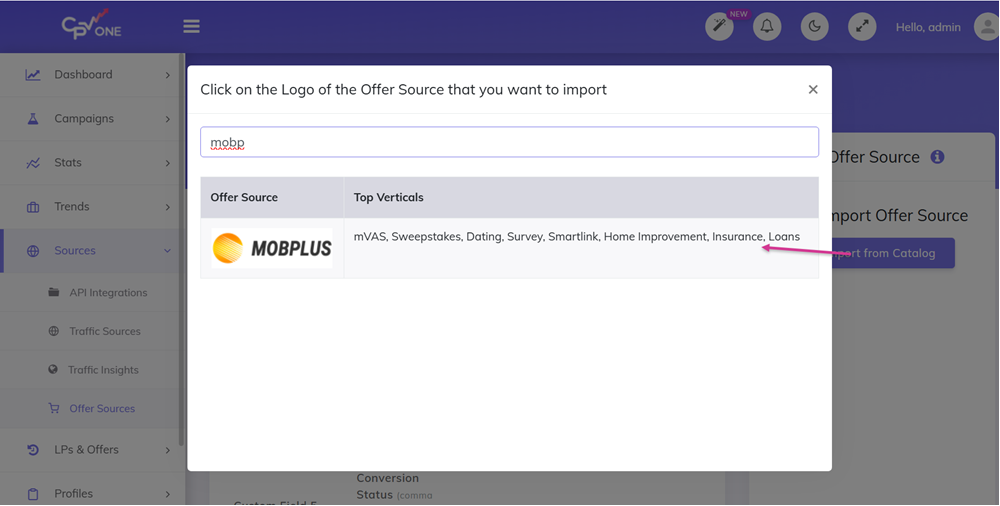
Once imported, the Mobplus Offer Source will be available in your account with the correct postback configuration pre-filled.
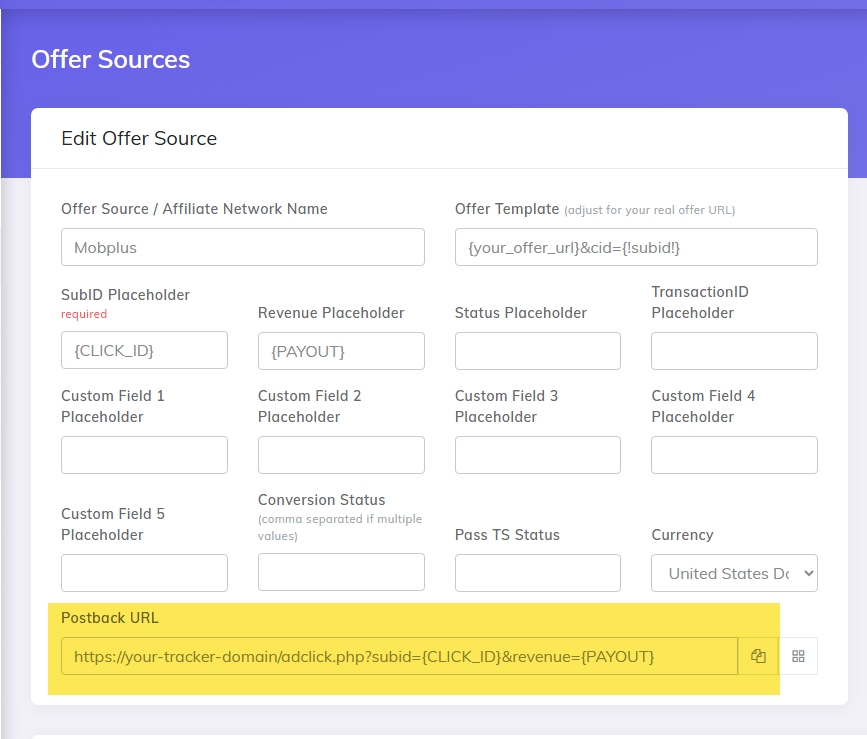
The Mobplus Offer Source is configured with the following details:
💡 Tip: If you do not see Mobplus in the catalog, you can add it manually. Use
click_idas the SubID parameter name. This is the parameter Mobplus uses to pass the unique click identifier back on conversion.
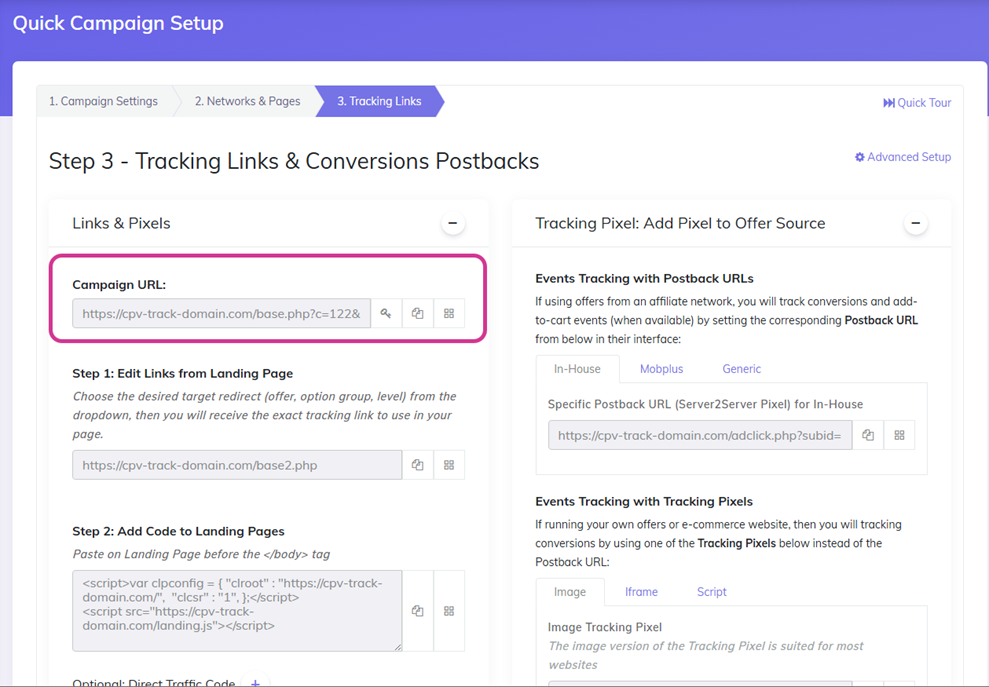
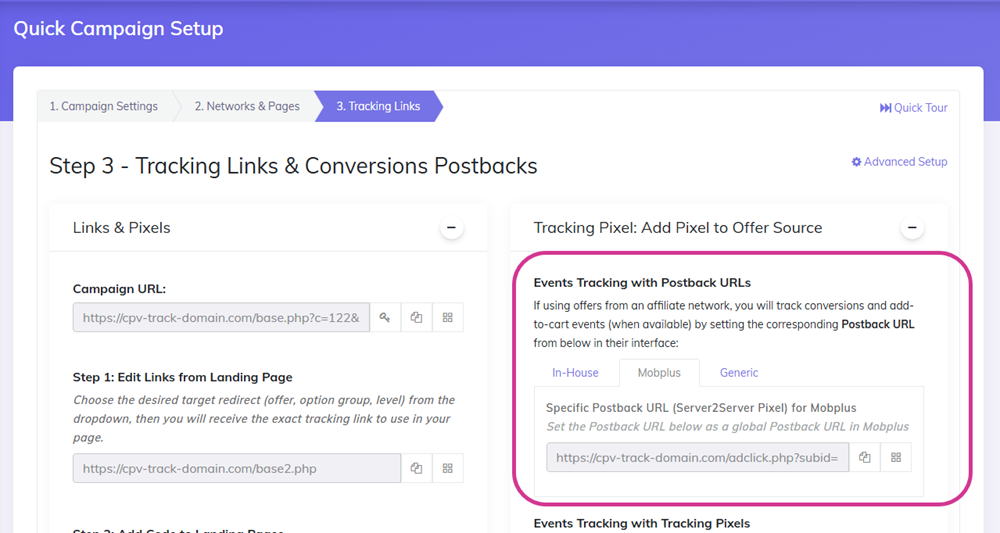
Step 2 - Set the Postback URL in Your Mobplus Account
CPV Lab | CPV One generates a unique Postback URL for each affiliate network. You need to add this URL to your Mobplus account so Mobplus can fire it when a conversion happens.
- Go to your CPV Lab | CPV One dashboard - Sources - Offer Sources
- Find the Mobplus offer source in the list and go on edit
- Copy the full Postback URL for it (check the image above)
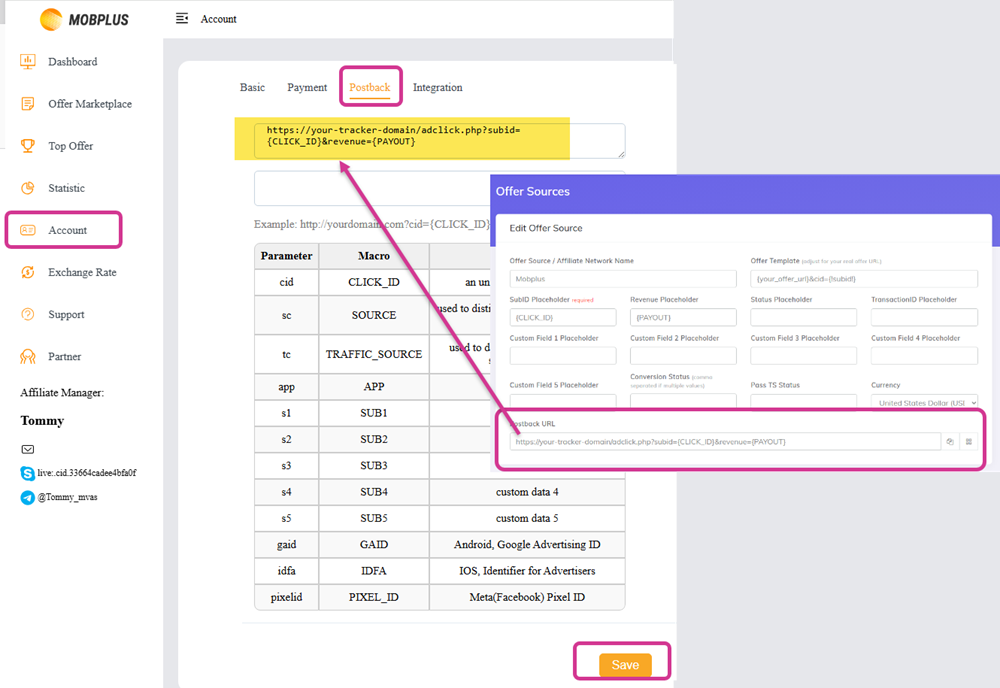
- Log in to your Mobplus account.
- Go to your Account - postback settings.
- Paste the CPV Lab Postback URL into the postback field.
The URL should look like this:
https://your-tracker-domain.com/adclick.php?subid={CLICK_ID}&revenue={PAYOUT}..
Step 3 - Select Your Mobplus Offer
- Log in to your Mobplus account.
- Browse the offer catalog / marketplace and choose the offer you want to promote.
- Click on the offer to open its details page.
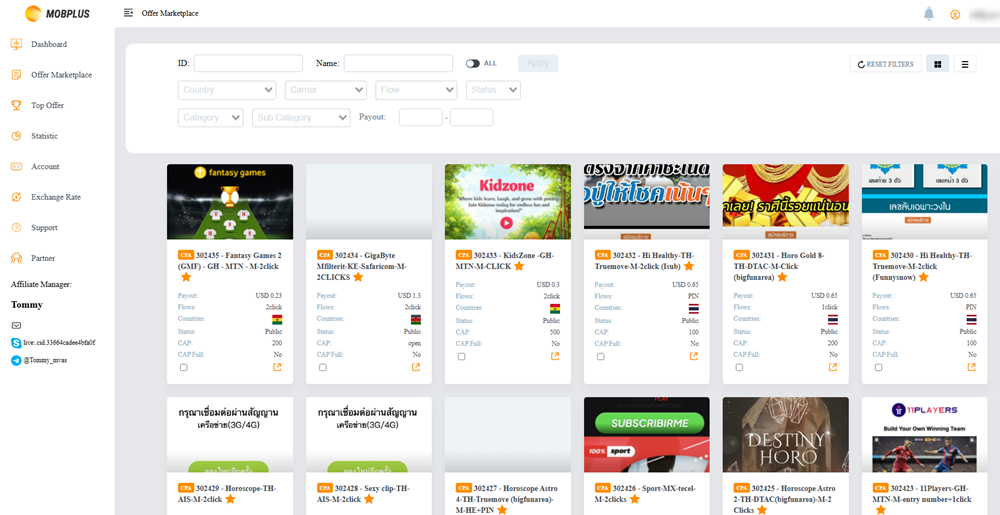
- Get the offer tracking link from the offer details page.
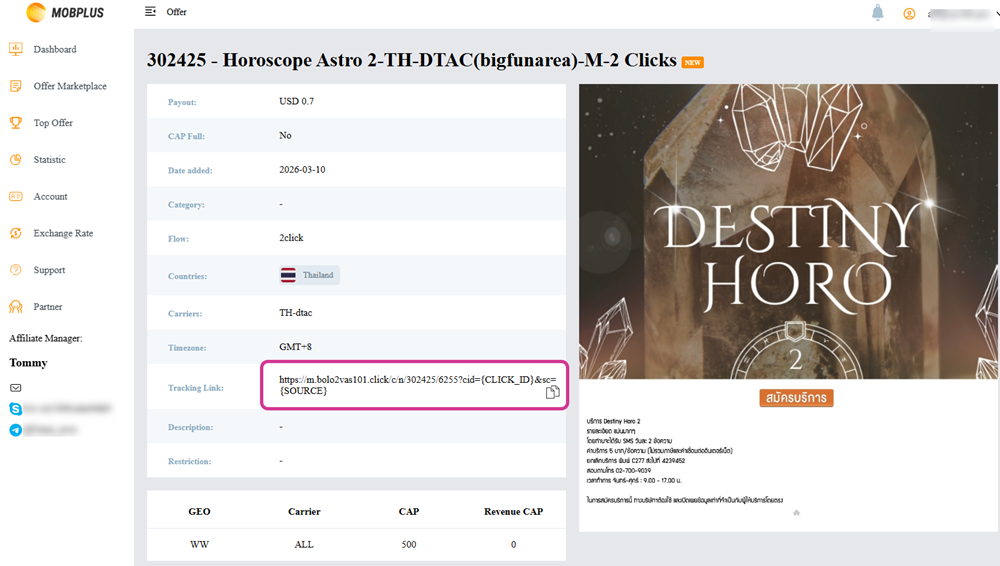
Copy this link. You will use it in the next step.
Step 4 - Add the Mobplus Offer Link to CPV Lab
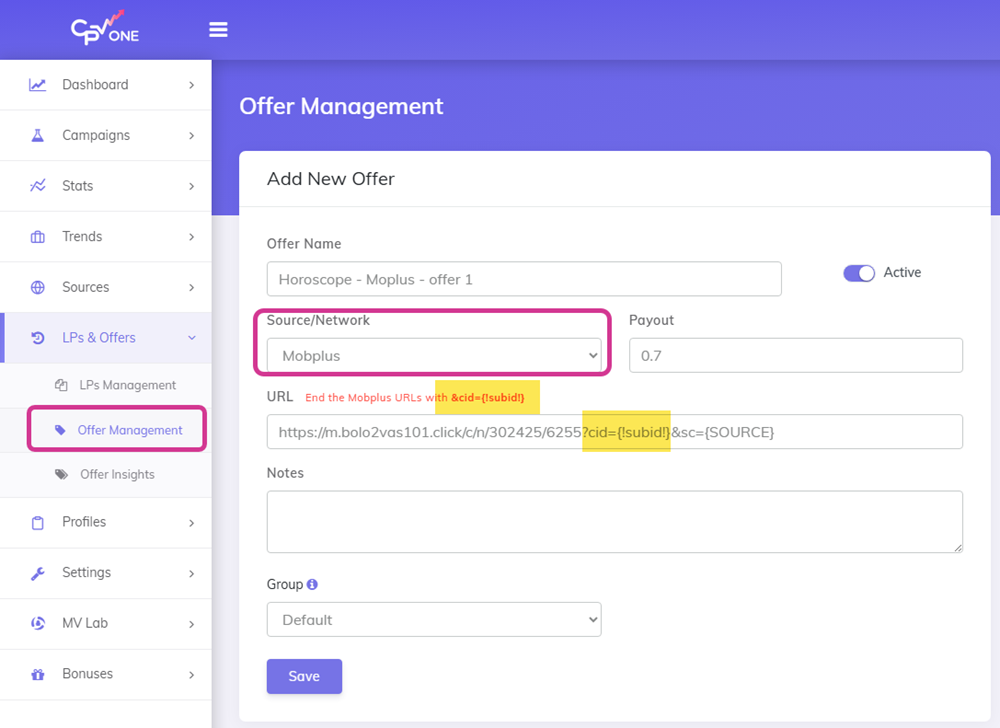
Now you need to create the offer inside CPV Lab | CPV One and add the tracking link you copied from Mobplus.
- Go to LPs & Offers ➡️ Offer Management in CPV Lab | CPV One.
- Fill in the offer details:
- Offer Name - give it a clear name so you can identify it easily
- Offer Source - select Mobplus (the one you imported in Step 1)
- Offer URL - paste the tracking link from Mobplus
- In the offer URL, make sure the
cidparameter has{!subid!}as its value. In the Source you can pass the source of your traffic or any other value you want.
⚠️ Critical: The
{!subid!}token must be set as the value for thecidparameter. Without this, Mobplus cannot pass the conversion data back to CPV Lab and your conversions will not be tracked.Example:
https://m.mobplus-track-link.click/c/n/302425/6255?cid={!subid!}}&sc={SOURCE}
- Click Save.
Step 5 - Create the Campaign
With the offer set up, you can now create your campaign in CPV Lab | CPV One.
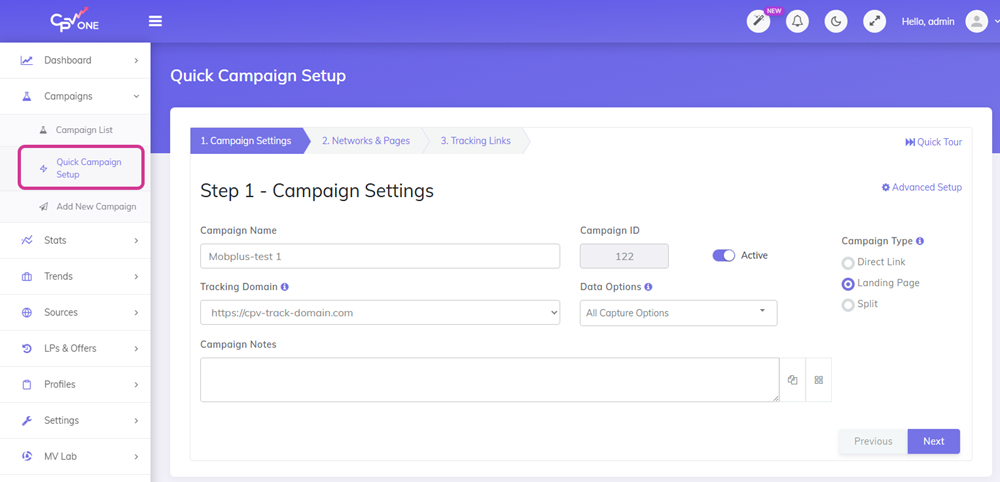
This example uses the Quick Campaign Setup.
- Go to Campaigns ➡️ Add New Campaign.
- Choose Quick Campaign Setup.
- Fill in the campaign details:
- Campaign Name - choose a name you will recognize
- Data Options - make sure you select the data options you want tracked
- Select your Traffic Source.
- In this example, Adsterra is used. Select whichever traffic source you are running traffic from.
- Make sure the traffic source template has been created in your account beforehand.
- Add the extra tokens you want captured from that traffic source
- Set your CPC price based on your traffic source bid.
- Select the Mobplus offer you created in Step 4.
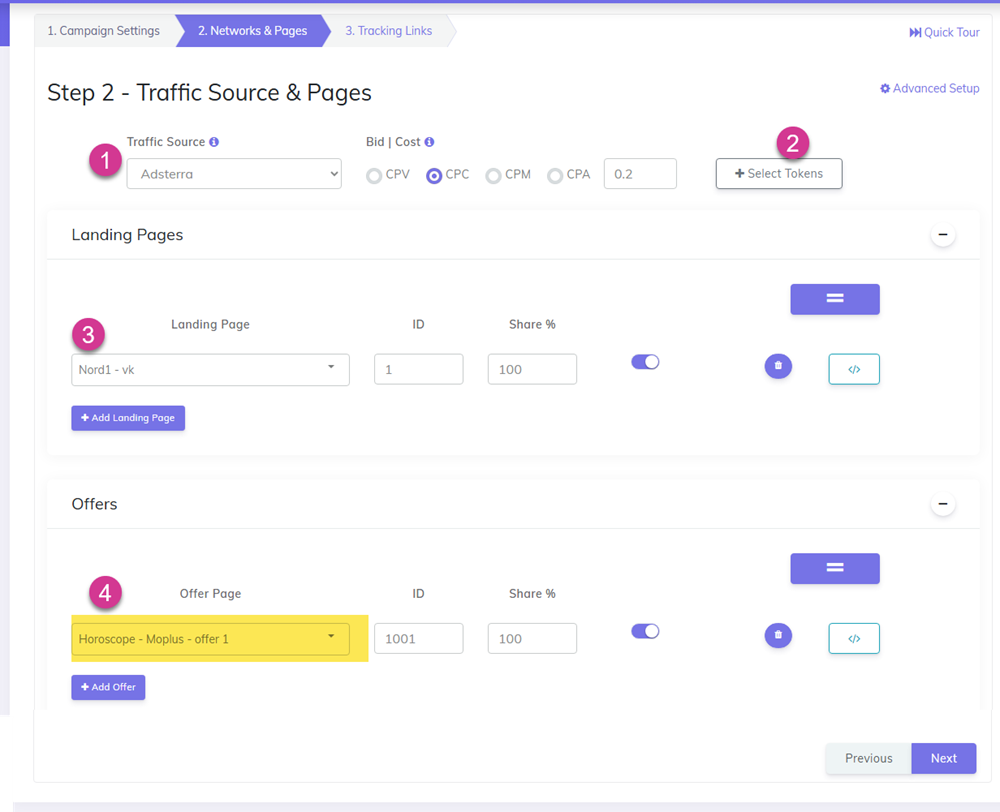
- Click Next to finish the campaign.
Test the Campaign
After saving, CPV Lab | CPV One will generate a Campaign URL (also called the Testing Link). You can load it in the browser and check that your funnel works well (and it goes to the Mobplus offer). You will see a visitor and a click registered in your Campaign Stats report.
Extra steps (optional but recommended):
- Send this Testing Link to your Mobplus Account Manager.
- Ask them to manually trigger one test conversion.
- This confirms the postback is firing correctly before you send real traffic.
Step 6 - Verify the Postback URL
Once you have set up the campaign and tested it, verify that the Postback URL is correctly configured.
- Go to your Campaign Setup page in CPV Lab | CPV One.
- Scroll to the Tracking Pixel section.
- Confirm the Postback URL is showing correctly.
After the test conversion is triggered by your Mobplus Account Manager, you should see 1 conversion appear in the Conversions column of your campaign report.
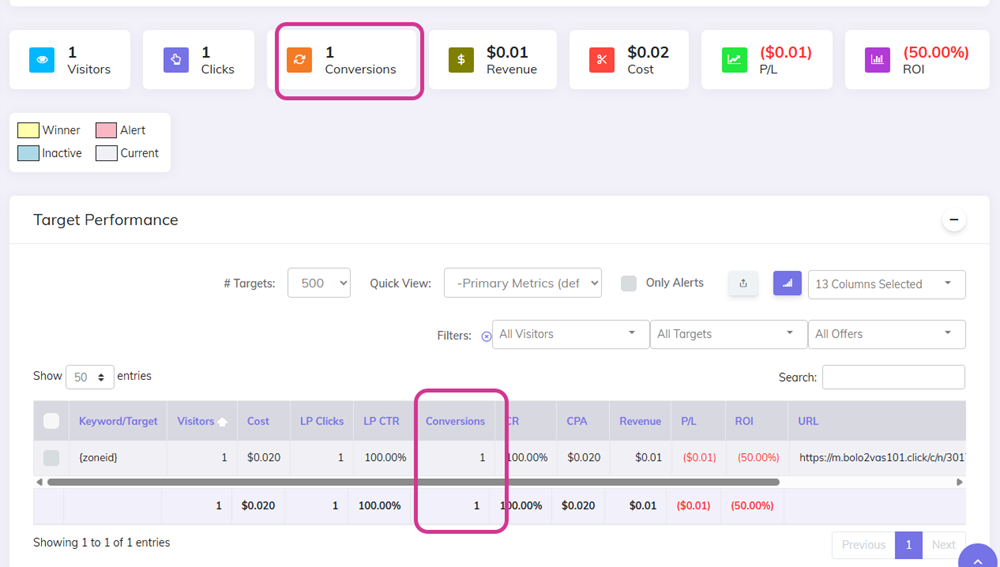
✅ If the conversion appears - the integration is working correctly. You are ready to send live traffic.
❌ If the conversion does not appear - go back and check:
- That the Postback URL is correctly set in your Mobplus account (Step 2)
- That
{!subid!}is set as thecidvalue in your offer URL (Step 4)- That the correct campaign is selected in your CPV Lab setup (Step 5)
Troubleshooting
Conversions are not showing in CPV Lab.
- Check that the Postback URL in your Mobplus account is the correct one from CPV Lab. Copy it fresh from the campaign setup page and re-paste it.
- Make sure
cid={!subid!}is in your offer URL. This is the most common cause of missing conversions.
The SubID is not being passed back.
- Check your Mobplus offer URL. The
cidparameter must use{!subid!}as its value - not a static number or left blank.
The Postback URL is not showing in the campaign setup.
- Make sure you selected Mobplus as the Offer Source when creating the offer.
- Re-open the campaign stats page after saving to refresh the view.
I am not seeing the Mobplus Offer Source in the catalog.
- Try searching for "Mobplus" in the catalog search bar.
- If it still does not appear, add it manually using
cidas the SubID parameter.
You may also find useful: